


Sewn by: Me (Stine)
Embroidery Design by: Cabbit Corner Embroidery
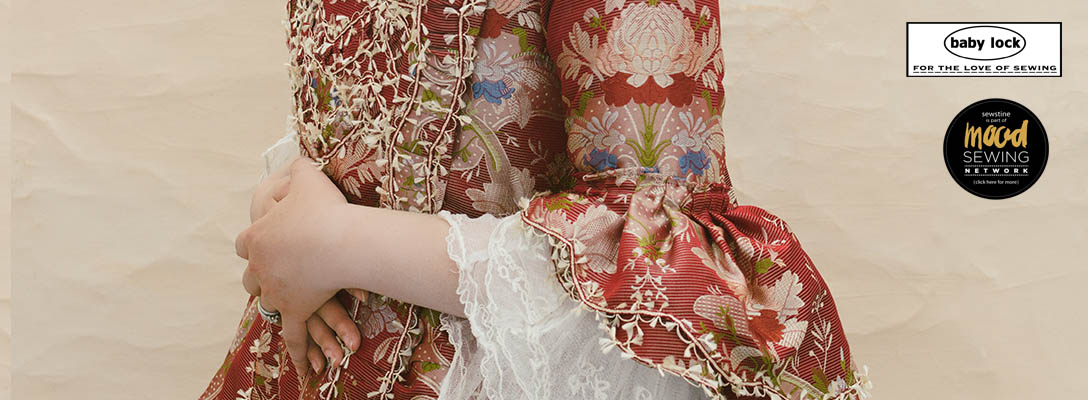
Fabric: Silk Duchesse from Mood, Linen lining from WM Booth Draper
Other Materials: Silk Thread by Tire Threads #50 from Superior Threads
Pattern: Recollections of JP Ryan for the shirt, breeches, waistcoat and (mostly) the coat.
Photography: Me (Stine)
Time Spent: ~450 hours
Two years back, I dragged my husband to Costume College. After seeing some amazing costumes there, my husband coyly suggested that I make him a frock coat. I LOVED the idea. Sadly, I had no desire to embroider an entire frock coat, and I refused to do anything less than the full embroidery. A year later, I bought myself a Brother VE2200 embroidery machine (with a very generous 12″x7″ bed) and got to work. My original plans were to simply get a jacobean-esque embroidery piece and kind of curve it to a coat line and hope for the best. This is where Cari of Cabbit Corner Embroidery stepped in.
Being an amazing digital artist and a professional fashion designer, she suggested that I find a pattern that I like, and have her convert it into an embroidery design. She even offered to go ahead and curve it to the actual coat pattern.
So I went ahead and scanned in the coat patterns, found the perfect design from cooper hewitt website, I sent it to her. It took 3 months for her to go about and convert it. I can’t imagine it was easy for her, but she did it. AND HOW.
After a lot of trial and error, where we worked closely to make sure that the design was both printable, and accurate (if you look, you’ll notice that even the angle of the embroidery is accurate to the original!), I went ahead and printed some pieces in some rayon thread lying around the house. After an initial trial, I realized the design had to be about 60% larger. I did not have the heart to ask Cari to redo the placement of the design- an endeavor that took her nearly 20 hours the first time around.
I taught myself to use PE Design 10, and edited it myself. I used lines to break up the design but to also help myself align the design on the silk perfectly and reprinted the front panel. This worked much better.
The final design was printed on black silk duchesse, using Tire Silk Threads, in 34 repeated designs. It took nearly 350 hours of printing, each repeat requiring 35 color changes. The pieces were then sewn by hand together, using whip stitching and blind stitching to line and sew it.
I cannot recommend the patterns I used enough:
JP Ryan’s Frock Coat http://www.jpryan.com/frock.htm
JP Ryan’s Waistcoat http://www.jpryan.com/waistcoa.htm
JP Ryans Breeches http://www.jpryan.com/details/breeches.htm
Of note, my husband being 6’3″ and very wide shouldered, I ended up editing the coat pattern considerably. I also changed the center back vent considerably to more closely match the vent in the museum piece I based it off of. The final pattern was nearly unrecognizable from the original. That being said, the coat pattern was edited, but still instrumental in making the final coat. Lesson: Always make a muslin. Or five. 🙂
Another tip: If you’re going to scan in a pattern piece and use it in PE Design 10 to bend and place a design, put in a ruler. Both horizontal and vertical.

Published by