1770s Frock Coat (#2) and women’s 1740s embroidered skirt and jacket

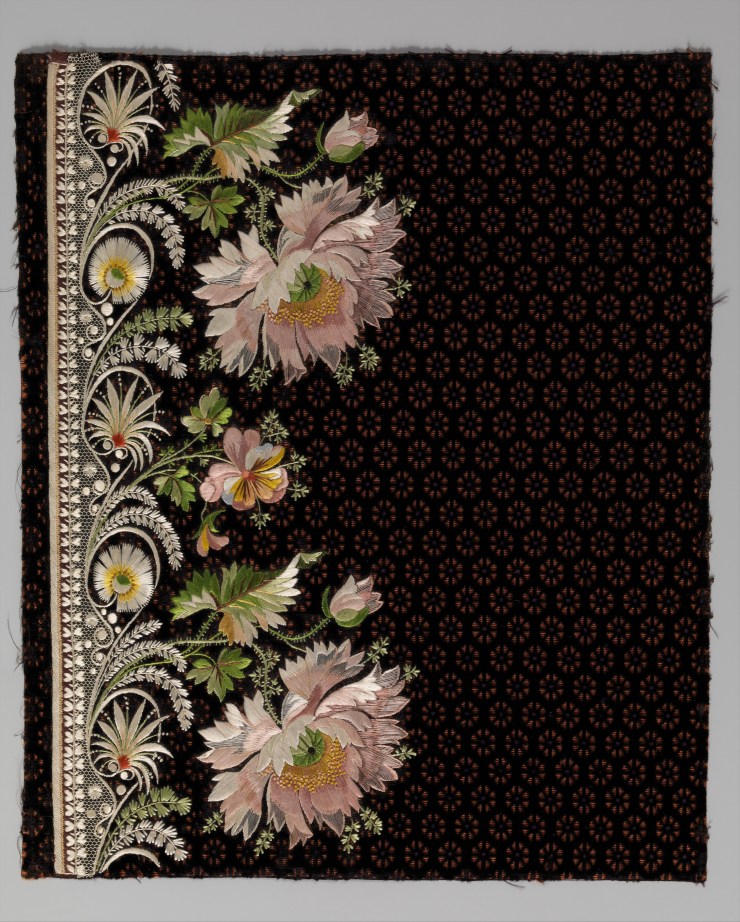
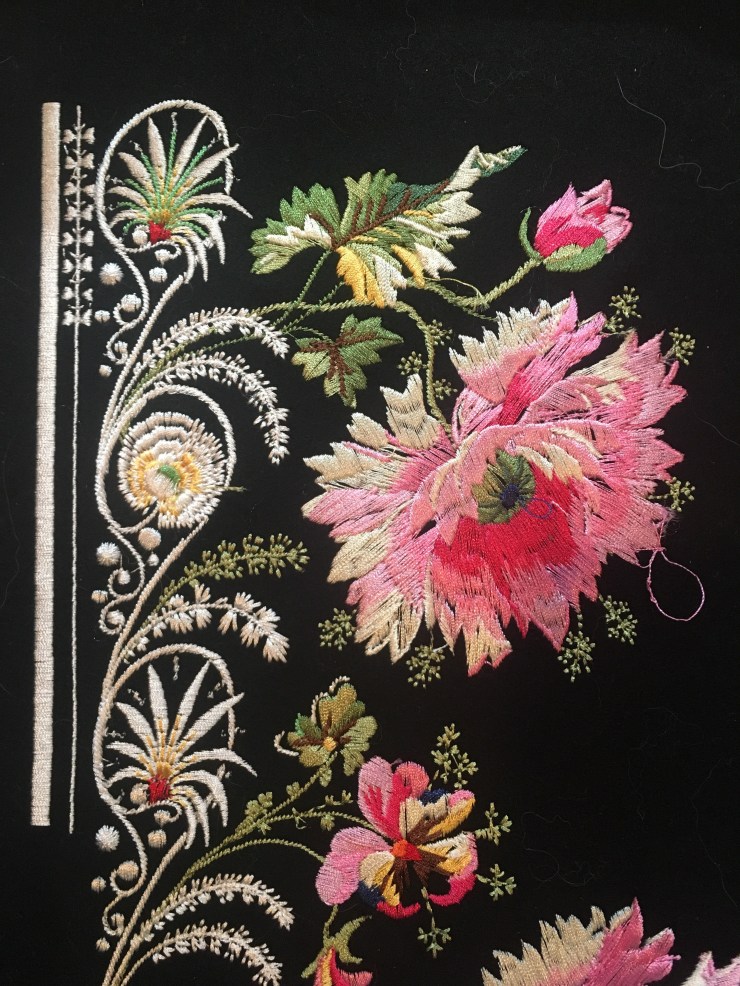
Last week I left off still attempting to perfect an 18th century flower in embroidery.

After spending approximately 28 hours on this design, I have come to the conclusion that: Conversion is fun, but incredibly time consuming. And unlike hand sewing, mentally exhausting.

It’s fun, but I’m glad that there are artists like Cari and Denise who do this professionally. I think I will personally do this maybe once or twice a year.

So what I do is I use my drawing pad to trace/draw out each color, determine stitch type, stitch density, the direction of the stitches, and move on to the next section. It’s incredibly time consuming, emotionally stressful, but also somewhat chatartic.

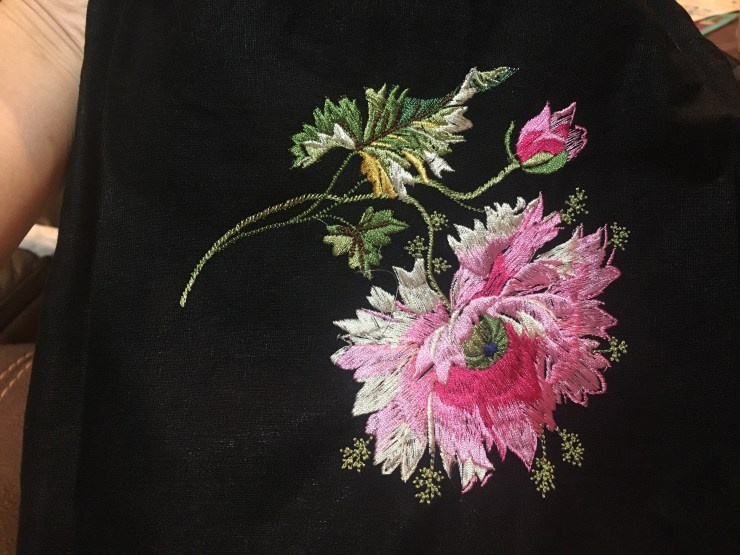
After printing this about another 3 times and messing with stitch types, I came up with this:

img_6039

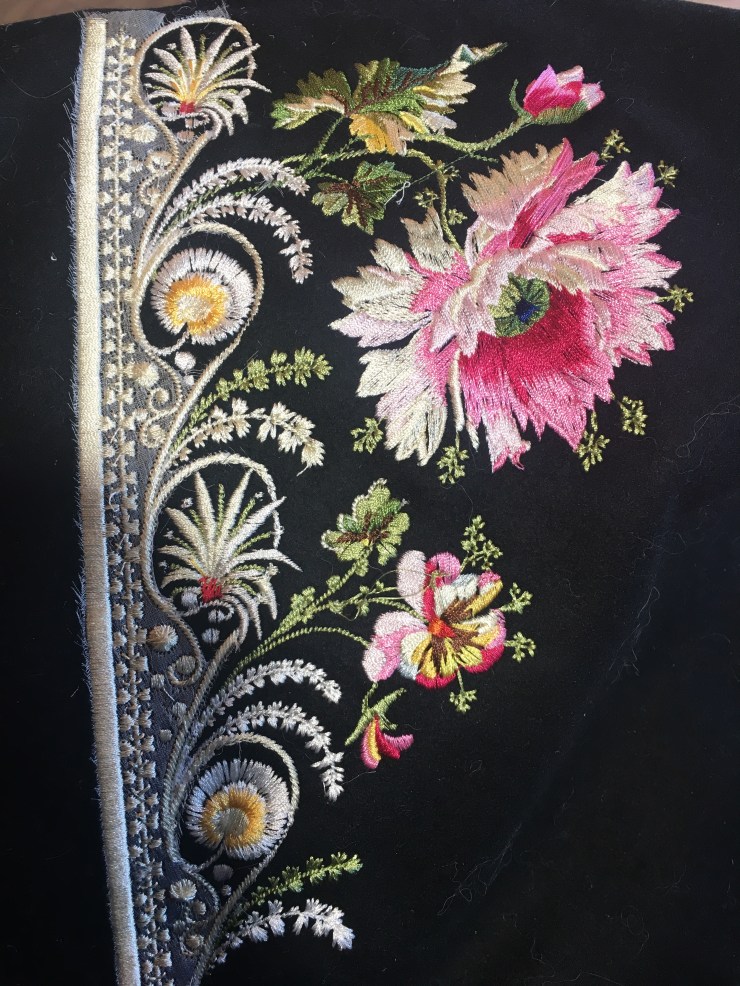
I designed the layout so that at the last two colors, I could pin a piece of mesh in there so I could get that lovely netting into the design. It turned out lovely.

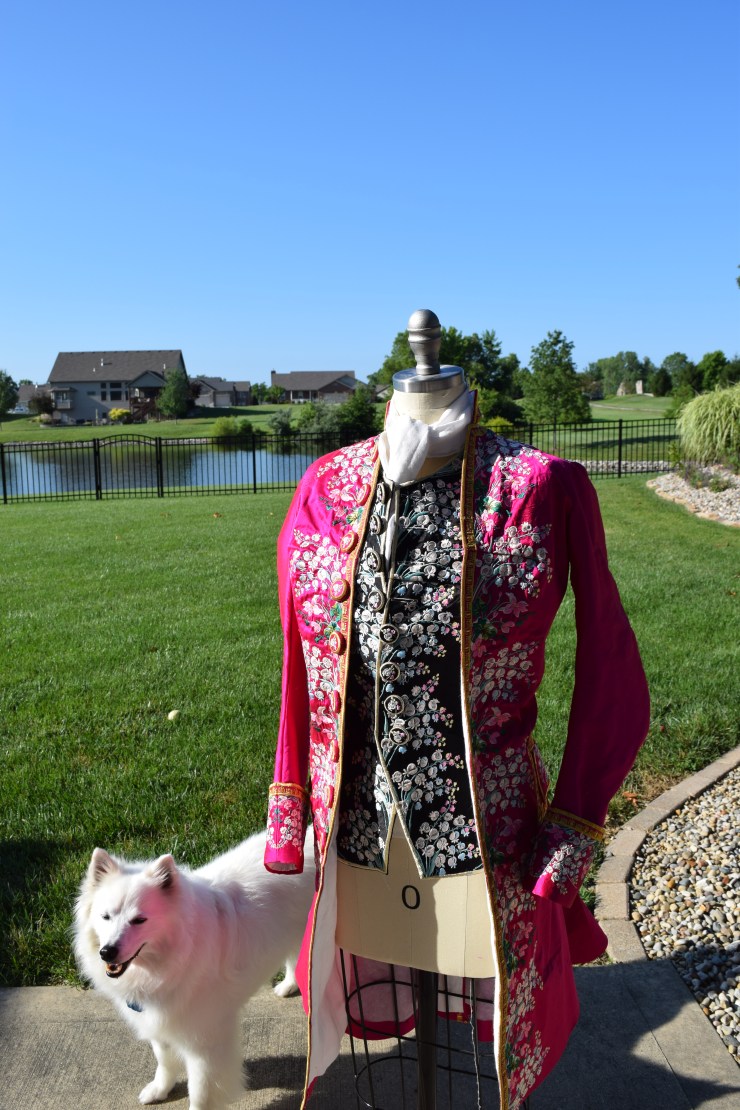
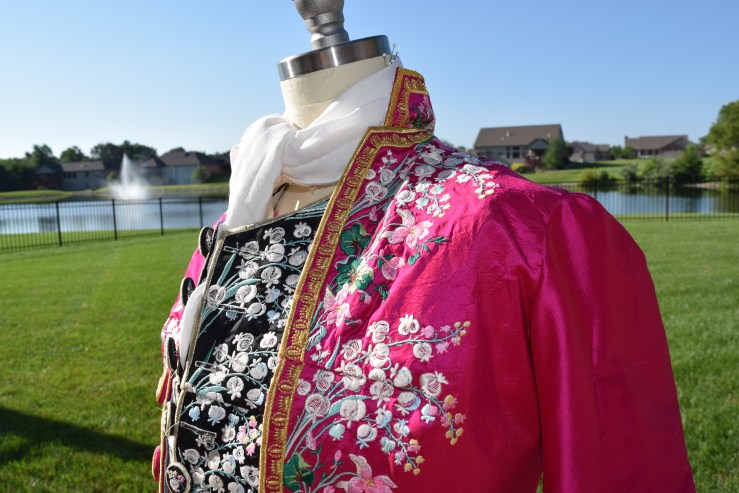
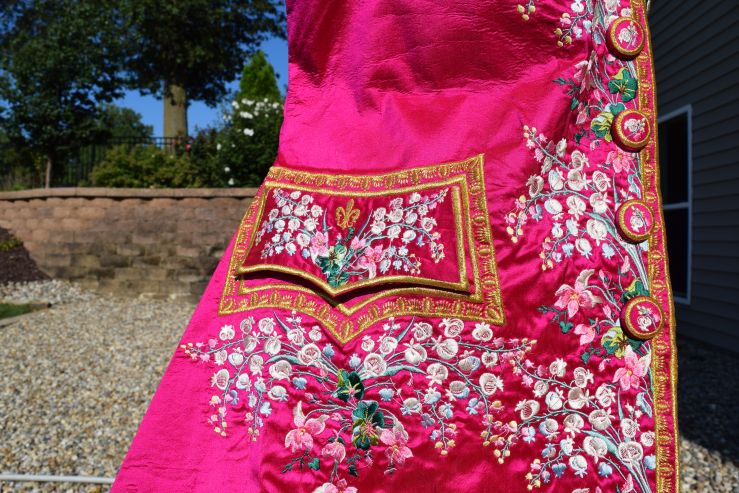
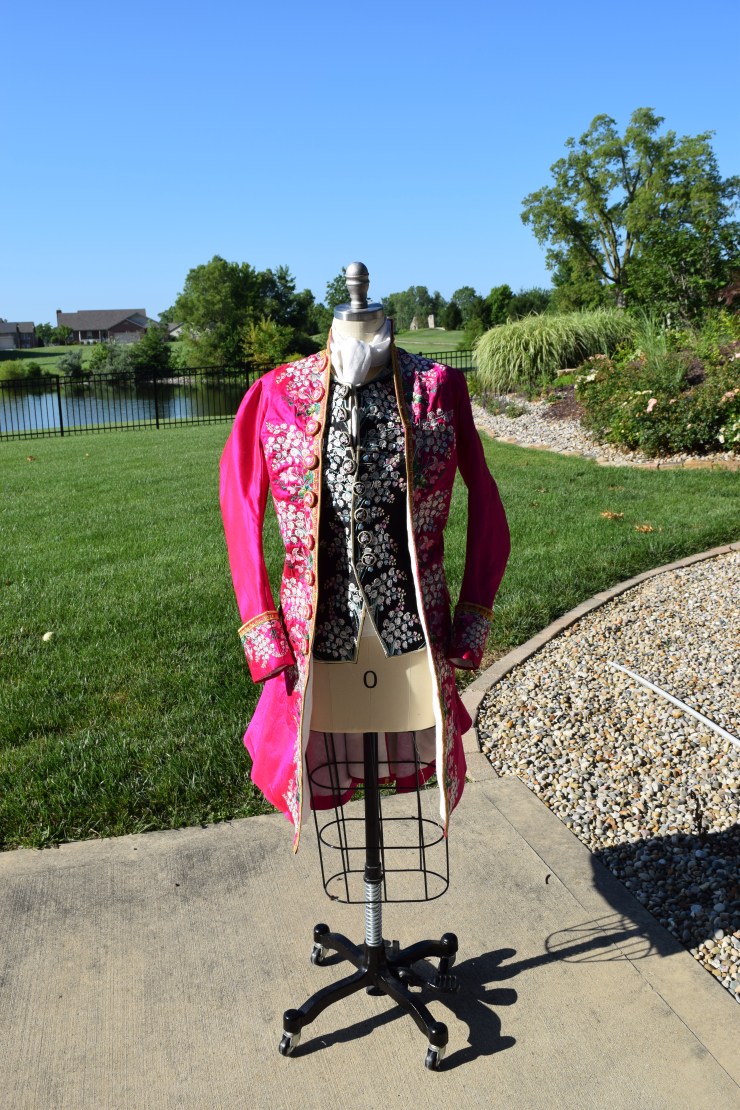
So then the question was, what to do with this? Obviously, the hubby would be getting a frock coat with this fabric. For me, personally, I wanted to try a stomacher first. Moving about the design to a stomacher was easy, and I have to say, I loved how it came out.

That being said, I need to figure out the interfacing situation more as this current interfacing has a penchant for wrinkling up considerably! (this interfacing is currently cotton woven interfacing with a layer of iron on adhesive in between).

I chose to make my next frock coat in a historically accurate ground. Surprisingly, some of the prettiest frock coats actually are not on solid colors but are on a ground of thin stripes or dots or flowers! I was pleasantly surprised to see this both on pinterest and when I went to the LACMA exhibit “Reigning Men” at the St Louis Art Museum.

As thin stripes on silk or HA dots and flowers are hard to find, there was really only one real viable source – Duran Textiles. If you don’t know them, I’d definitely check them out. They probably have some of the most beautiful fabrics in the world in their collection and I very frequently see their fabrics in one movie or another. After some emails, Laila of Duran sent me a handful of beautiful samples. I pressed one after the other on Matt’s skin and I still couldn’t decide. “This one brings out your eyes”, “But this one might be too busy”… etc. After two hours of discussion, we still had no clue.

I ended up gluing the samples onto a piece of wool and putting the design on the fabric. That answered the question right away!

img_6050

I ended up going with the blue on the bottom left. I actually bought an extra six yards so I could make myself a coordinating jacket and skirt. (:

More when the fabric arrives!

Women’s Embroidered Jacket circa 1760

Though I normally depend on the talented Cari Barg from Cabbit Corner to make my embroidery, she has been inundated with other commissions since Costume College 2017. She offered to work on my next pattern in September or October, but I thought I would take this moment to put what I learned from CoCo to good use. (Namely, I took a course with Denise Hendricks from Romantic Recollections, which was really enlightening. I’m looking forward to her posting her full lecture online so all the world can benefit from her expertise.)

After making two frock coats, I’ve decided I really want to work on several things:

  1. Another Frock coat for Matt – 1770s again, but I learned so much about fit so I would like to try again. This time I plan on springing for some delicious fabric by Duran Textiles.
  2. A yellow pet en lair/jacket skirt combo in silk. I got some beautiful silk taffeta by Oscar de la Renta while I visited New York City two weeks ago.
  3. A court gown. 10 yards of stunning Scalamandre with my name on it is sitting around my house right now, waiting for me to get the skills and courage to cut into it.
  4. Lucrezia de Borgia’s red gown. I loved that series and I think a Renaissance gown would make for fun times.

The original “next plan” was to learn robe a la francaises while making myself this gown in the Met. I rarely make an exact museum copy and I thought this would be good exercise, especially since I’m very displeased with my robe a la francaise skills.

It helps that I really did find the most perfect shade of yellow silk taffeta for this from Mood! However, as I was playing with my pinking iron (if you don’t have one, I highly recommend messaging the good people at Resurrection Ironworks; they do custom pieces beautifully.)

But then planning Matt’s coat, I started work on digitizing Matt’s embroidery piece (which I’ll talk more about later), and I realized, “No. I want to make an embroidered set for me.” But I wanted a gown. I did some research on pinterest, internet, and my books, and it seems that there were actually quite a few embroidered women’s gowns. I mean, that makes sense. If they embroidered stuff for men, why on earth would they not want to do the same for women?

Nonetheless, there seems to be very few examples of embroidered pen en lairs/women’s jackets for women. I made a pinterest board with a few examples but please send me a shoutout here or on instagram if you see any more!

In particular, these two coats were very impressive:

I would love to do a heavily embroidered piece like this. I don’t anticipate it’ll be HA, so partly HA, party fantasy. But I’m starting to realize that I actually enjoy the fantasy element of HA clothing a bit (I mean, my pink frock coat was utter fantasy and so much fun to wear!), so I’ll be making this in fantasy rather than HA. So after some thought, I decided to put aside robe a la francaise aspirations for a bit so I could turn this into a dream outfit in yellow silk. More on patterning this coat out once I start, but for now, I turn to digitizing the embroidery for this.

While hunting about the internet, I fell head over heels in love with this Met Embroidery sample. I mean, it’s a very famous piece and absolutely gorgeous.

embroidery sample1

This was Matt’s favorite that he saw online so we discussed turning this into an embroidery for him. Again my tools are as follows:

Computer/Tablet: Surface Book

Program: PE Design 10

Machine: Brother VE 2200 (12″x7″ bed)

So I started to trace this out for him.

This was my first attempt on the flower:

What looked fine enough as a computer file looked terrible printed! On the plus side, it took only 35 minutes to print. So I upped the “semi transparent” portions from 50 stitches/inch to 70 stitches/inch, increased the density of the whole thing fro 114/inch to 140 stitches/inch. I tried to minimize some of those gaps and tried again:

Woo! Closer. Not great but definitely closer. This one took 55 minutes to print. At this point, I decided that the transpoarent sections just weren’t working for me so I nixed it. I increased the size of some of those patchy sections and tried a third time.

img_6010

Definitely closer! (This one took 120 minutes.). I posted it on instagram and started on the border. At this point, Denise chimed in and suggested that I up the pull compensation. After playing with it a great deal more, I took her suggestion, and tried again.

By this time, my dog Gideon was a fluffball sleeping next to me which made changing threads painful since each time I got up I’d have to wake him up. Nonetheless, there was something lovely and cathartic about dog breathing.


img_6024

A whopping 195 minutes of sewing time later (not counting thread changes), it was done! I liked it. I liked it a lot. Not perfect by any means, but certainly closer. I can say I’ve poured about 17 hours into this design so far, and it’s definitely getting there. I’m working on version #5 today so we’ll see about that one later.

But for now, I’m pleased with how my first attempt at HA digitization is going.


1740s Frock Coat for Women – Part 3 – Sewing and Wearing

Frock Coat

Embroidery of the frockcoat started well; I started on the back 2 panels, and loved the way it came together there. The right front panel was done. Then I messed up the left front panel. Redoing 6 panels of embroidery cost me approximately $100 in thread/silk, and put me a week behind schedule.

As for the embroidery of the coat itself, after much experimentation, I came up with a way to stiffen the silk taffeta enough to not pull too much with the heavy embroidery. I ended up backing the silk taffeta with a layer of iron on adhesive, and then a layer of pellon polyester interfacing. Of course this made the coat profoundly stiff, but did stand up beautifully to the embroidery, not pulling much at all. Tradeoffs I guess. I did attempt to do cotton interfacing but could not find a good one that worked as well as the polyester. It broke my heart a little to have to give up and use polyester, but… I guess if I were in the 18th century, I would go with whatever looked best too! Bah!

Unlike a lot of my friends, I am a profoundly slow seamstress and tend to stress myself out when I get too close to a deadline. Due to having to redo the left front panel of the coat, I actually finished 2 days prior to leaving for CoCo 2017. Many thanks to the hubby for providing me wine and vodka when sewing got stressful.

I did to go to a LACMA exhibit on men’s clothing, (on loan from the LACMA but at the SLAM in St. Louis) and got to see several frockcoats in person. One thing I found to my surprise was that the coats were lined to the edge with linen! I was absoulutely thrilled to find that out – what I had done to my coats out of sheer laziness, was actually being done by the actual people of the 18th century!

I was absolutely blown away by this coat in particular. This is what I want to do for my third coat. (Most likely for the hubby since he looks so pretty in them.)

In any case, I took the easy way out and ended up iron interfacing the hem along the bottom of the frock coat. Not only did the iron on adhesive glue give me no stitching across the end for a clean look, it also stiffened the bottom giving me a beautiful sway with the coat. Iron on adhesives man. Amazing. If they had that technology in 1740 they would have used it. Along with iron on adhesive. And epidurals for labor. Just saying.

Waistcoat

Similarly, I ended up sewing the hem to the edge with no facing. I did put in machine made button holes; but may I say, unless you’re super confident with button holes to do machine ones? I find that the machine embroidery tends to unravel rather obscenely.

So note on button making:

  1. Save yourself some heartache and get yourself a button hole kit with a clear button holder. This way you can clearly center your design.
  2. I usually print 10 buttons/ 12″x7″ sheet; no use being too greedy with this since you want to have enough room to cut buttons out with ease.
  3. After you do make your buttons, get some nice epoxy glue and glue the back together. I find that the embroidered silk is thicker so that the button wants to fall apart with any stress. The glue helps that immensely.
  4. Prepare to make extra buttons. Even with a ton of practice, 1/4 buttons turn out hideous.
  5. So after putting the metal top part of the button into your button maker, pull on the edges of the fabric all around to remove wrinkles. Wrinkles are your enemy. Then tuck it all in, and place the back piece on. Pop it out. Glue it. Wait 12 hours. You’re set!

Shirt

I sewed my shirt using Larkin and Smith’s instructions. It was awesomely fun and easy though incredibly time consuming. I’m kind of done with shirt sewing for a good year or two. Some pictures of the shirt pre-ruffle. I did do the stitch everywhere I could because the stitch was PRETTY. 🙂

Breeches

Breeches were done using the JP Ryan pattern. I made no adjustments on the muslin other than removing 1″ of bulk from the back of the pants. I also changed the instructions by flat lining my silk taffeta as the fabric seemed incredibly thin. 5 stars out of 5. 10 out of 10 Stines would use this pattern again. My one suggestion – follow the instructions to the letter. They are GOOD.

Stockings and Shoes

Burnley and Trowbridge stockings worked beautifully, albeit a bit large for me. I used American duchess shoes, though I wish I purchased some more glittery shoe buckles. Next time I guess. 🙂

Finished pictures:


Overall, I can honestly say that I LOVED making and wearing this coat. It was honestly a giant blast to make – especially since I gave myself two full months of just working on this. It was also my most comfortable costume by FAR. No corset, comfy linen shirt, comfy linen pants, and great range of motion. I mean, I know that we’re trying to take back the corset by dispelling the notion that everyone tight laced and women were fainting left and right – and it’s true! Corsets are not the monstrosity everyone claims they were. That being said, OH MAN THIS WAS COMFY. There is something to be said for full range of motion of legs, arms and body.

On top of it, I just find machine embroidery and sewing to be incredibly relaxing, especially after a long day (literally, 24 hours at a time) of work. So highly recommended as a hobby.

Now, time to get Duran Textiles to respond to my messages so I can get started on Frock Coat #3!