So where I left off on my last post about my V and A coat adventures was that I had just finished ONE part of the coat. For those of you who follow me on my IG ( @sewstine ), you’ve been bored to death I’m sure with sneak peaks of everything in action. In any case, here is the reveal!
It took me about 2 months to finish the other side, the waistcoats, the buttons, the breeches straps, the backs, the collars, the pockets, the waistcoat pockets, the cuffs, etc. Once I had all the parts collected, I started the fun process of sewing it together.


I had him try it on with just the shell.
I actually do something slightly different from other people. I sewed the entire exterior together, and then got each lining piece and just sewed it on by hand to the coat, from the interfacing. Not a usual way to do it, but with the heaviness of the interfacing, it made the most sense.
For the VERY heavily embroidered areas in the front, I used linen buckram, reinforced with gum arabic and blind stitched it to the front. I the covered it with the linen to it wouldn’t be seen. But this prevented some unfortunate buckling in the embroidery- an issue I had with ALL my frock coats to date. 🙂 It seemed to work but I’ll let you judge for yourself at the end of this article.
Once all that was settled, I added pockets to this coat! This is my first frock coat I added pockets to, mostly because I didn’t trust Matt in the past to not stretch it out by putting too much in it and distorting the shape of the garment. And let’s face it – heavily filled pockets usually end up ruining the exterior shape of ANY garment (unless it’s covered by a pocket hoop! Whee!).


I even added the SECRET pocket on the right side of the coat. I first noticed it after it was pointed out by Pinsent Tailor on 18th century sewing group, and wanted it for Matt. I used some heavy handed button hole stitches to make it for Matt as well. His will hold a secret little locket, made for me by Queen and Cavendish, filled with a picture of me (drawn by @belindal.illustrates ). I really do wonder what marvelous little secrets that original pocket held. Love letters? Historic goat intestine condoms? Snuff? I really do hope it wasn’t snuff and something a little more fun in nature.

At this point, I started making buttons. In the past, I used modern button kits but finding that those buttons break apart so easily, and Matt tends to manhandle his buttons, I decided to go ahead and make them the old fashioned way. I got some button “moulds” from Burnley and Trowbridge, and went at them. After a few attempts, this seemed to work best.

- Cut a GENEROUS margin around your embroidered button.
- Give a margin of around 35% of the button diameter and sew a circle around the button shape.
- Trim off excess fabric but don’t cut too close to your stitches. And don’t cut your string (did that like 5 times…)
- Pull it closed.
- Insert your bone or wood button mould.
- Sew it shut, and make sure it’s tight
I sewed a LOT of buttons this way.

I added these, and voila! Coat was done.
Meanwhile, I made up the waistcoat (also using the JP Ryan pattern). However, Matt’s weight fluctuates about 30 pounds in any given 3 months, so I went ahead and made his lace up in the back with some hand-sewn eyelets.
I also made up his pants using the JP Ryan pattern – which I think is a FABULOUS breeches pattern and I don’t think there is a better one out there. Please correct me in the comments if I’m wrong – I’d LOVE to learn. I actually did play with the pattern a LOT on these. While her sizing is good, Matt’s thighs are HUGE. I went ahead and added another 2″ to each thigh, and took out about 10″ on the buttocks. While I understand that the “diaper butt” look to breeches is totally HA, I for one like admiring my husband’s fine rear end. So I went ahead and made it a little more tight. It’s still a little baggy to account for movement as well as his weight fluctuations.

As for the breeches straps, I made it as close to the original as possible. That being said, I noticed the design didn’t print well much smaller than it was, so I made the straps 1.25″ instead of the pattern’s recommended 1″. I didn’t think much of it at the time, but once I was done, I realized my error. Almost all breeches buckles on the market are designed for 1″ straps, and due to the embroidery, the straps didn’t fold very well. I ended up buying two neck stock buckles to compensate, though I may get actual breeches straps now that I found some. 🙂
As for his shirt, I made him a hand sewn shirt complete with THE STITCH (per the pattern by Larkin and Smith) about a year ago so we decided to rewear that. Please note my beloved gathers at his wrist. 🙂
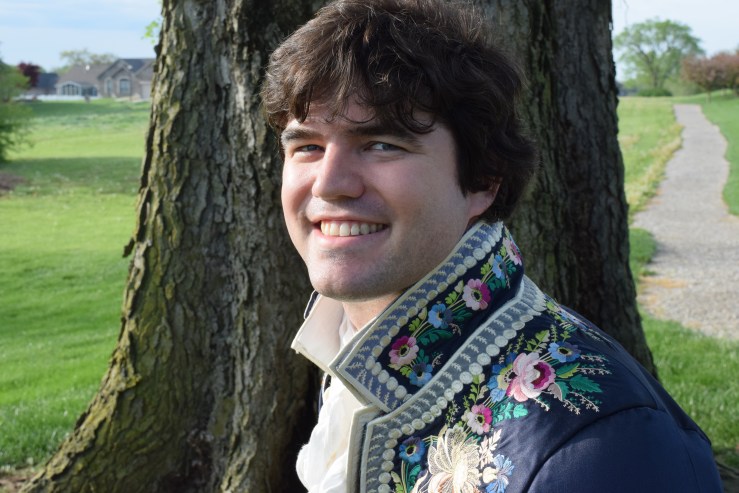
Ok, no more talking. Here are the photos of the finished piece.


Some closeups:


Seriously, Matt is a fun model to photograph…
The Waistcoat:


And for funzies, a closeup of the stroke gathers:


Your husband’s entire outfit turned out superb! I am also not a fan of the ‘diaper butt’ look on men. I’m not sure why that was ever fashionable but hey! They liked it back then, right? At least we have the option to alter things to our tastes nowadays. The embroidery looks spectacular and it would also take me hours upon hours to stitch out on my Designer Diamond Royale machine. I’m in a lot of the same Facebook groups you’re in as well but I learned a lot more about the process you followed by reading your blogs. They’re very entertaining and enjoyable! Oh, and those buttons turned out perfect. Please keep doing these blog entries. I’ve learned a lot by reading them.
LikeLike