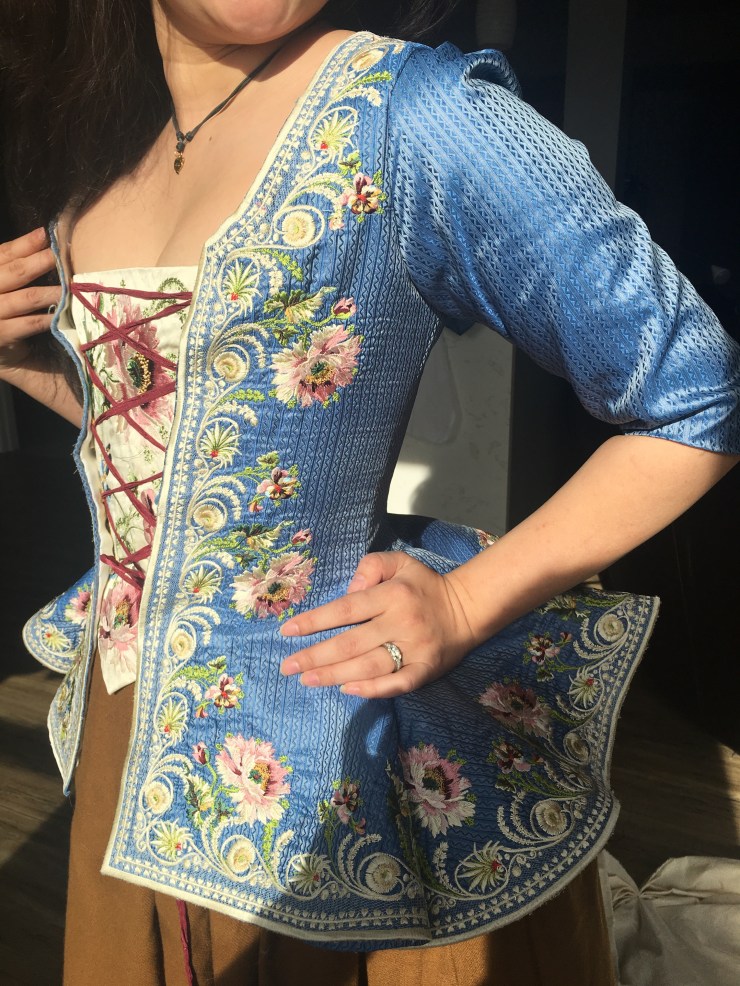
I can’t hold back my excitement anymore – this is how the jacket looks so far(albeit unfinished)!

So this is the story of how we go from a little idea to this blue jacket (which I love so far).
First off – I want to preface this by saying: This is NOT the finished article! The closure isn’t quite set yet and the cuffs are not done.
So after the blue jabric came, the first thing I did was make myself an embroidered stomacher. I made one in blue; didn’t love it, made one in cream. Still don’t love it (the pink kind of blends into the background) but we’ll see how it goes. I may make myself a third.


I also tested out the pattern by making the same jacket for myself in brown wool. I had some gorgeous wool broadcloth lying around the houes (unused, unloved for about two years now), so I used it to make myself an Outlander-esque dress.

I was shocked at how much I loved the pattern! It was comfortable, it was flattering – it was exactly what I wanted. So I started in by doing what I always do – putting a ruler on each pattern piece, scanning it in, and placing the digitization on it. (More on it on previous posts, but I use PE Design 10). This was a particularly painful design to place due to the high stitch counts (each repeat was approximately 45,000 stitches) and the slug-like nature of PE Design 10. (I get asked repeated if I would recommende the software, and I repeatedly say only if you’re very patient.) I went ahead and started sewing it out.


On a side note, I decided to try horsehair iron on interfacing for this jacket and I confess I have a love hate relationship with it too. It works, but it’s very expensive ($10.50 per yard) and it tends to wrinkle the final look a little. But honestly, for embroidery THIS heavy, it seems to work the best. I’ll let you know if I ever find a better substitute, but so far, no.
I did get a new machine somewhere in the middle of this, so at least the 30 thread changes were significantly less painful thanks to my brand new Brother PR1000!!!
It not only decreases the amount of time it takes to embroider each repeat (7 hours becomes 4.5), it also decreases the number of thread changes I go through! I danced around the house for hours.

I LOVE this new machine with a vengeance. My dogs are unspeakably jealous at how much I stroke and pet this machine.
In any case, after about 150 hours of machine embroidery time (not including 12 hours digitization time), I came out with ALL the pieces needed to make the coat.


So I spent some time piecing it together. So the way I do it is a little odd; I will go ahead and iron fold ALL edges with embroidery. I then glue it on using iron on adhesive or iron on hem tape (SO NOT HA, but honestly, neither is machine embroidery). I actually love that stuff because it gives a little stiffness to the hem as well so it flares out prettier. Almost like horsehair braid for trims in the 19th century! You can see the jacket in the above pictures – the hem is NOT sewn or cut. It is just folded over, ironed and glued on using iron on hem tape. It works dreamily – I think!
Once all the embroidered hems on all individual pieces have been glued down, I then machine sew it together, and iron all the folds open. This is about the point where I first realized that this jacket was in fact a good idea and not just a terrible money pit.
Again, I know some HA people will get upset with me for my use for iron on adhesive, monetary support of iron on interfacing, and machine sewing – but I tend to machine sew all seams. I really just don’t have time for it. Anything visible I DO handsew. For instance, my sleeves are all hand sewn, hand hemmed.
So then I sewed on my sleeves, and started work embroidering the cuffs.
I can’t lie – embroidering cuffs are painful. We’re talking 12 hours of embroidery PER cuff. It’s the border! The flowers take 1.5 hour to embroider – each. The swirls, the lace… that takes 4.5 to embroider each. O_O But I did it. And attached it.


And hated it. I hated the way the flower curled on itself… I hated the folds… It wasn’t long enough. Bah!
Just to put this into perspective, THIS is what I was going for.
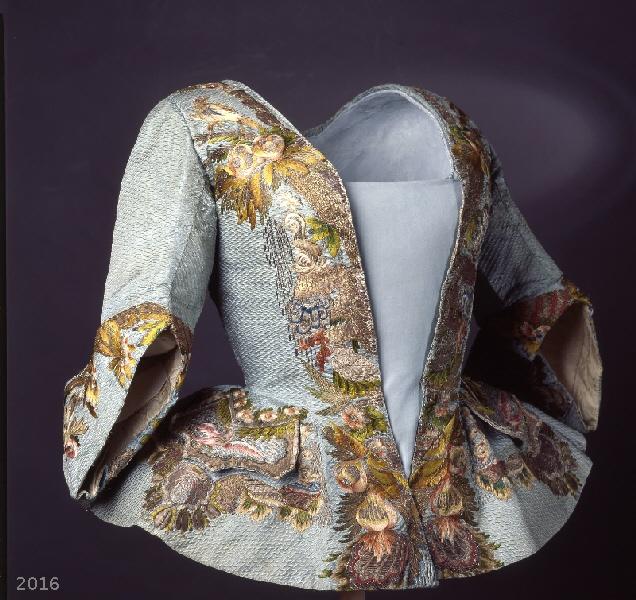
Embroidered piqué jacket, ca. 1740, Museo del Traje, Spain.
Of course, mine isn’t supposed to be an exact replica but I did love the IDEA of having large luxurious cuffs. Mine didn’t cut it. So I designed new ones. In any case, I realized shortly after that I was out of silk netting. I went ahead and ordered more but til that gets here, I won’t be able to do anything about it. ![]() Well, meanwhile, I gave the jacket a linen lining. I do sew all my linings in my hand along the edge.
Well, meanwhile, I gave the jacket a linen lining. I do sew all my linings in my hand along the edge.

And voila! Ready for a test wear!
Meanwhile, I do plan on making a blue petticoat with the same embroidery along the edge, lacy engageantes (sleeve ruffles), and a pretty embroidered apron to go! Any opinions out there about headwear? I do seem to have so little care about headwear!
More to come! And Merry Christmas and Happy Holidays!

Ahhh, so beautiful!
I’m new here, so just a question. How did you learn how to make these clothes?
LikeLike
Thank you so much! I am mostly self taught using books. Mumsy taught me to sew using basic patterns- which you can learn at any quilting store- but after that, I recommend reading all sorts of books. If you’re interested, think about joining 18th century sewing group on Facebook! 🙂
LikeLike