
Apologies for the super long post – but there was a lot of different things that went into making this dress.
We decided last year while I was four months pregnant, that we would go to the Saint Louis Symphony Orchestra to hear Mozart in costume. We all agreed to make 1780’s outfits, even though I really didn’t like 1780’s (I mean, zone fronts just never spoke to me!). But, there WAS one that I did love – the color, the embroidery, the happy way it just all melded together…
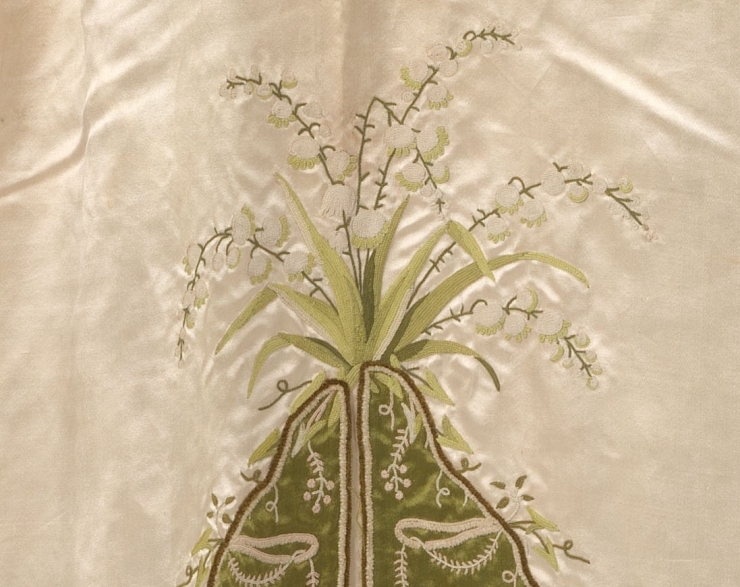
This is the dress in question:

Rijks Museum
Item number – BK-1978-250
1786-1789
I emailed the Rijks Museum and they were kind enough to give me some back and side shots as well. I will not be sharing these here in full form since I’m not sure if they would be ok with it. I will show snippets of them here and there below, where I’m describing some of the seams. Suffice to say that these pictures are incredibly helpful and beautiful, and if you have any interest, you should go ahead and ask for them. The Rijks Museum is incredibly helpful and I can’t emphasize how grateful I am that they’re that generous.
During the research phase of this project (all of October and November 2018), IG’s @the_corsettedbeauty kindly led me to a the book called Costume and Fashion by the Rijks Museum, (available for purchase on Amazon here, if you’re interested). This book explained how this gorgeous gown had been heavily altered for a costume party in the 1880’s, including a picture of someone WEARING this gown during the Victorian era as a living tableau. (An aside: This book is absolutely fabulous – high quality pictures and fantastic information with long descriptions of each item.)
I’m really starting to realize how the Victorians were the plague of locusts upon art and history, changing everything to suit their needs, whether it was cannibalizing gorgeous laces and gowns, or destroying Roman art that didn’t fit their prudish sensibilities. In any case, this gown had been heavily modified.
Modern Mantua Maker was incredibly kind with her time and used her oceanic knowledge base to figure out which seams were period to the 1780’s and which were most likely modified by the Victorians. For instance, the horizontal seam in the front of the gown was machine sewn, and so definitely done by the Victorians. There were more subtle things as well – for instance, the dart in the back was added by the Victorians later, which explained the bad ruching and wrinkling in the bodice. Those silly Victorian locusts!


The circled areas are just some of the modifications done by the Victorians. Base pictures from the Rijks Museum.
Just looking at these pictures, it became evident that there was a LOT of digitizing of embroidery to be done. This is the list I came up with.
- Front button hole (white/pink/green) as seen on the green portions of the dress
- Contrast color button hole (white/brown/green) as seen on the white portions of the dress
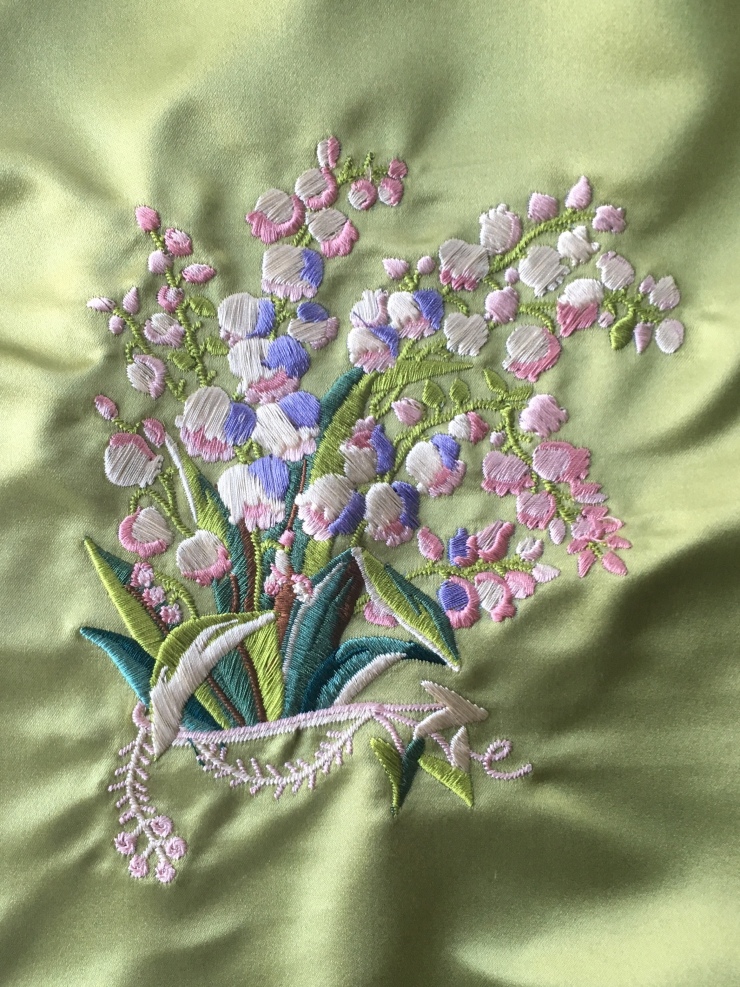
- Bouquet of lilies on the bodice front
- 2 Bouquets of lilies on the gown bottom held together with a garland
- Bouquet of lilies at the waist seam
- Mariner’s cuff loops and leaves
- Embroidery along the edge of the gown bodice front
- Front collar emboridery
- Back collar embroidery
- Petticoat embroidery along the border of the white and the green (which has delicate little swirls and leaves along it)
- Bouquet of lilies at the top of the petticoat
- Bouquet of lilies at the side of the petticoat
- A DIFFERENT bouquet of lilies at the side of the petticoat
- Lily cluster at the bottom of the petticoat 1
- A second cluster of lilies at the bottom of the petticoat
- A THIRD AND DIFFERENT cluster of lilies at the bottom of the petticoat
Yes, we are looking at no less than 6 DIFFERENT bouquets of lilies and 3 different clusters of them!


I circled a few of them for you here so you could see what I mean.
I came to realize this was my most ambitious project to date. There were a LOT of primary digitizations to be done. With all this figured out, I started, but decided to make some changes to the original gown for mine.
These were the changes I decided to do intentionally.
- The shape of the gown was altered. The original gown’s front has a very square appearance. I drew it as below, so you could see it. The shape isn’t easy to decipher, but after staring at it for a long time, I came to the conclusion that this was the actual shape of the front. (If anyone knows differently, please correct me.)
 I didn’t LOVE that shape, and instead decided to change the shape to a more typical redingote shape (the sloped V in front). (Please don’t hate me!)
 - By changing the shape of the front, it removed a few inches from the waist of the gown, which left me about 3″ less on each side for the embroidery of the waist bouquets. I chose to remove the bouquet portion of the embroidery at the waist, leaving just the ribbon loops and bows.
- The petticoat at the bottom is… curious. At some point during its original inception in the 1780s, the gown’s recipient changed from someone short to someone tall. Instead of fixing it, they just kind of coughed and looked the other way. Look at how abruptly the embroidery ends there. (circled portion on image below) Anyone else find this super awkward? Modern Mantua Maker assured me that the gown had never been sewn for up someone of that short height, and from looking at this, her guess was that the lilies were supposed to go down all the way to the bottom of the petticoat, as were the button holes. So I decided my gown would have this as well.

- All changes the Victorians made obviously (and badly) were omitted, including the machine seam at the front waist, the bad ruching in the back, and the mismatched pleating along the sides.
- And most significantly of all (to me at least) – the original gown was done in tambour embroidery. I have major respect for the embroiderer(s) of this gown, but I myself do not have the time, patience, or skill to do it, so I chose to do all embroidery on the machine. Moreover, I couldn’t find a satisfactory way to replicate tambour on my machine (I did try! Really, I did!) so I chose to turn all the tamboured areas into satin stitch or stem stitch.
 You can see here how the original has incredible tambour (on the right). embroidery The left is an early draft of my version in satin stitch. This particular one is an early draft in polyester thread on some cotton linen scraps lying around the house but you can see how the tambour and the satin stitch are different. At the same time, I also loved my version and chose to continue with the satin stitch.
 - Some of the colors were changed – for instance, the embroidery on the top of the petticoat was just white and green. I chose to add pink because… I like pink. Also these lilies just looked really basic to me, and I liked the more complex lilies like the ones on the bodice. So I swapped them out and freehanded it.
So there we go! Some alterations, etc, were all done to try to make this gown and I started digitizing and embroidering – all about 7-8 months (34-37 weeks if you prefer weeks like me) pregnant.
So here are some early digitizations and experiments I did.


One thing that I don’t know if people understand, is HOW MUCH TIME it takes for you digitize, embroider, and fix it, to get it to look RIGHT. Just because it looks good on a screen doesn’t mean it’s all done. A lot of fixing and post correction has to be done before it looks good. So yes, it may take about 2-3 hours to digitize something small (or 6-8 hours for some of the larger bouquets). But then you have to go and print it which takes another 3-4 hours, and then I would spend another 2-3 hours (or another 8-10 hours for a larger bouquet) afterwards fixing the details I didn’t like! Or… maybe I’m just bad and slow at this because I’m self taught…
Needless to say, it took a while. Meanwhile, I got fabric samples for green silk from a bunch of places. The original gown is clearly done in silk satin, so I went ahead and ordered a bunch of silk duchesse samples. No one seemed to have the right green. I found one company who made just the right shade of apple/moss/green-yellow green… but then when I went to order 11 yards, they found that they only had 2. Finally, I found the perfect shade from NY Designer Fabrics… but only in double faced silk duchesse. At this point, I had emotionally given up on not spending a fortune to make this dress. I sighed, apologized to my credit card, and paid for the double faced satin…
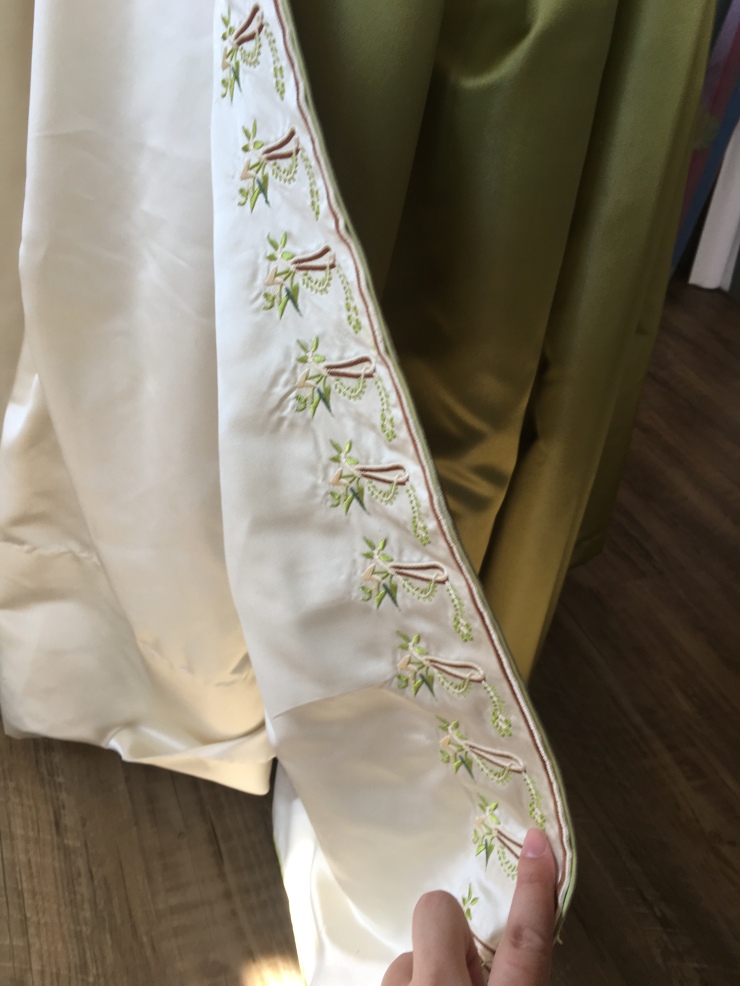
AND I AM NEVER GOING BACK TO SINGLE FACED SATIN. CHECK THIS OUT:
Now, what you’re NOT seeing is the backside. Usually in order to handle embroidery this heavy (without pulling stray threads and utterly destroying the base fabric), I have to interface the ENTIRE gown or piece of fabric with horsehair interfacing. Yes, Matt’s frock coat is ENTIRELY lined with horsehair interfacing. It turns out that had I just paid for double faced silk satin, I wouldn’t have had to. So in some ways, the double face satin pays for itself (Ok. I’m exaggerating. Financially, it actually doesn’t add up to the same cost. Double faced silk is still more expensive. But it does drape better, and I like the look of it better, so I’ll pay for it.)
I ended up lining the entire double faced silk portion of the gown with only tear away interfacing, which normally would not be strong enough for this much heavy embroidery!
So what you’re seeing up there is my first draft in silk threads on silk embroidery, with tear away interfacing. This was December 2nd. I put this on the printer, admired it, and then went into work for my 24 hour call shift at the hospital.
At the end of that shift, I went into labor.
By December 4th, I had a new baby boy! Malcolm! He was born 2 and a half weeks early, but still healthy at 7 pounds and 8 ounces. And I’d be a terrible mother if I didn’t share pictures of how cute and wonderful he is.


Yes! So obviously, I’d stop sewing right?
Ehh…
It turns out that he hated sleep unless it was directly on human flesh. So at night, Matt and I would take turns being a human mattress and cuddling him while he slept. It was absolutely adorable and endearing. For the first 48 hours… After that, we were wondering what sleep felt like and fantasizing about getting more than 4 hours at a time. This was especially true since since we couldn’t fall asleep as we held him, lest we drop him when our arms gave out.
So at night, I started digitizing all 16 portions of the gown. Night after night, I would cuddle my beautiful son in one arm and with the other, I digitized bouquet after bouquet. I would occasionally run my embroidery machine to try out these patterns during the day, and then edit again at night. Normally I would keep track of how long I spend digitizing for my own amusement, but in this case, I failed to do so. I was so sleep deprived I couldn’t remember if I had eaten that day, moreover how much I had digitized.

In any case, this is how I finished the embroidery WAY faster than I thought I would. By the time he was four weeks old, I was done with most of the embroidery and had started on draping out the bodice.
PSA: After you have the baby, you still look pregnant. For up to about 6-8 weeks afterwards. This is because your uterus still has to go back to its normal size (a process called involution) which takes a while.
So during this period, I just made my dummy up to reflect a larger size than I had been and starting patterning…


I used the draping method on my dummy to get a pattern.
I tested this pattern on a dummy piece using some muslin.


I used just the draping method as well as the pattern of the LACMA’s redingote, as well as what I got from Norah Waugh’s book to draft this. Looks good, right?
NO. I made a 6 piece back, which was wrong. The original actually had a 4 piece back, which is a lot more standard to the 1780’s but the way the Victorian’s (damn Victorians!) had darted it, it looked like a 6 piece back in some shots. I edited this, made a second muslin (didn’t take a photo of it), confirmed that I liked it. Then I then traced the pattern pieces I would need to put embroidery onto white paper, then scanned those in.

(You’re welcome to use this pattern piece if you’re remotely interested btw, though I won’t be posting any of the back pieces… because that’s extra work. 😛 )
I then put this into my embroidery program (PE Design 10) and started placing all the pieces on it.


You can see the embroidery pieces all lined up on screen, then printed onto some random broadcloth I had lying around the house to test alignment.


Phew! A lot of work already right? Well, I had to make a sleeve pattern. Honestly, I suck at sleeves. ALL sleeves are sleevils to me. Luckily, Lady of the Wilderness came out like a beacon of light, and posted two videos – one on how to draft sleeves, and another on how to fit sleeves – ALL in one day. She saved my butt big time. I won’t go into the details of it because I don’t feel like reliving it… but at the end, I had a sleeve pattern.
So at this point, I felt like I liked my pattern enough to start printing on the real thing so I got started. I ordered ALL thread I could find in this country in my colors (Tire Silk #50 wt, colors: #20 for the brown, #36 for the pale pink, #156 for the creamy white, #37 for the bright pink, #96 for the light green, and a bunch of others for everything else). Honestly, the pattern could have used some perfecting, but you know what – I had a baby who only slept 2 hours at a time, I was breastfeeding, getting over a C-section, and my husband had just gone back to work (for his 2 weeks notice, but you know, those 2 weeks still sucked), and my mother in law had just gone back to the East coast… So… frog it (we’re dong animal based cursing in our house now that we have a small child), I had to get started on the real deal at some point – I decided to ignore the imperfections and just start sewing.


I was inspired by Lady of the Wilderness so I decided to sew all non long skirt and sleeve seams by hand… So I got started with the back seams…


I used the American Duchess book as my personal guide along with tidbits from Amber’s Dress in a Weekend adventure. I can’t recommend both sources enough. I ended up English stitching the back together and LOVED IT. Hand sewing was just the relaxing activity to do on my moments off that I needed.


Of note, the gown itself has a contrast lining in white with green/brown embroidery (circled on the left). I LOVE this aspect of the gown, though I’m not sure I will be leaving the gown opened on the sides like the original. I wasn’t sure how far up the contrast went, so in mine, I had it go ALL the way up. 🙂 It wasn’t too hard – just time consuming. I just embroidered both parts and hand sewed them together, making sure that each false button hole lined up to the opposite color on the other side.


So here you can see the dress coming together.
While this was going on, Malcolm was still not sleeping so I was making excellent headway digitizing the petticoat. Reminder, there is a LOT of embroidery on the petticoat…


But turns out when you give up sleep, you can get anything done pretty fast.
So I digitized the petticoat, and converted this incredibly large piece of embroidery into 15 easy to print pieces… Except for where it wasn’t easy.


I ended up making some errors in alignment, which I couldn’t fix and will have to live with. At least until the Superior Threads imports more Tire Silk Thread #50 wt, color #20.
I show this not to be bratty, but because I want to emphasize – we ALL make mistakes in our gowns. We all frog up pretty hard at some point. And we all scream “Frogging Shark!” (Except it wasn’t animal based cursing when I did it IRL) and “Son of a Beehive!” – but then we weep for a while and pout and move on and finish.
And the key part of that sentence, is the word “Finish”. Because I did finish this gown. I was angry, pissed but I chose to share this on IG, yell a lot at myself, and then move on.
At which point I promptly messed up another alignment.


And I may redo the petticoat some day. But that day will probably be when my son decides he likes sleep.
So after all that, I started sewing things together and the petticoat came together pretty fast. I chose to put a lace up panel inside of the gown, which is attached to the gown at both sides of the dress (through all layers of fabric using tiny stitches), so that there is less stress on the silk embroidery when I pin the gown closed using dress pins. I’m not sure if the original Rijk Museum has it, but it is present in some 1780s gowns, including the LACMA redingote.


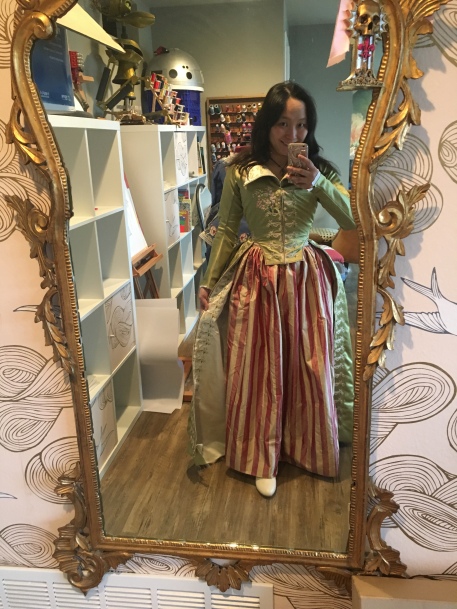
So at this point… I went ahead and finished the gown. Here are some pictures of the gown on my mannequin.


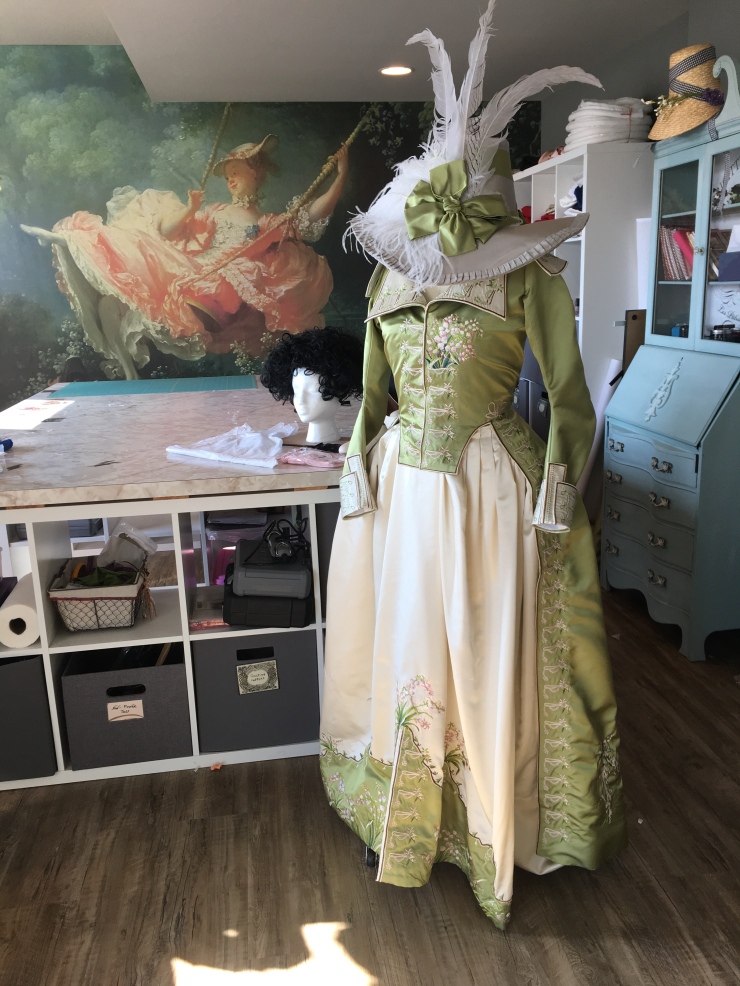


And every outfit needs amazing accessories, and here are mine: 
The hat is from Shocking Bad Hats, the shoes and pink clocked stockings are from American Duchess, the hair piece is by Jenny La Fleur, thin black silk ribbon from Renaissance fabrics, neckerchief from Burnley and Trowbridge, and shoes buckles from Sign of the Grey Horse.
Phew! So that’s the story of the Green Redingote!
I will be wearing this dress this coming Sunday for the Symphony at the St Louis Symphony Orchestra! Hold on for more pictures then!

Wow STUNNING! and congratulations on your beautiful baby!
LikeLike
Oh my goodness this is so beautiful.
LikeLike
Thank you so much for sharing. I was just looking around and at first was just sorta interested. But. You really got me excited reading about your adventures and embroidery and sewing. Thank you fir transporting me into your world. It’s is amazing. Thank an jealous
LikeLike
Omg PHENOMENAL work!!! And also, congratulations, Malcolm is adorable ❤
LikeLike
Squee I just want to pet all the silk satin! Stunning as always (and even with your close-up photos I can’t see the mistakes on my phone)
I am so impressed you got anything done with a baby, my son was born in July and was also the only-sleeps-on-a-person type and the only thing I did was spend hours on Instagram starting at all the photos from Costume College that were posted!
LikeLike
OMGOODNESS I am in awe of you and your God given talent. Your work is absolutely breathtaking! How you balance self, wife, mother, job AND amazing hobby (?) (and do them all so well) is beyond me. Keep up the great work and I love the posts!
And Malcolm is one adorable boy! And a blessed one 🙏😍
LikeLike
My children slept on my chest for the first year or so, because they would only sleep on their stomachs & we were afraid to leave them alone (& I was nursing & they were actually able to find the drinks station in the dark!). So we propped my arms up on pillows on either side & I slept like that, If your next child also must sleep on you/r husband, you might consider that.
(Gorgeous work, BTW)
LikeLike
Fantastic work! I do hope you can do your next project with a bit more sleep though!
LikeLike
Please write a book about all your amazing adventures…..best seller!
LikeLike
Well let me pick my teeth up off the floor because this just gobsmacked me!
Really incredible piece of art you created. It would be astonishing under any life circumstances but a new baby and working ?! You are super women! Can’t wait to see more photos. Congratulations on your finish and your gorgeous family 🌹
LikeLike
Holy cow! It looks amazing, and I am in shock the museum was just like “yeah sure, here a more photos!” I can’t wait to see photos of you in full costume.
LikeLike
Wow, what beautiful work! I just love this time period!
LikeLike
Good heavens, that is one of the most beautiful and beautifully wrought things I’ve ever seen. I’m just floored. Absolutely amazing. Also, congratulations on the baby. He’s adorable.
LikeLike